Wednesday, February 27, 2013

Quilt | The Big One

This quilt has been a LONG time coming.  I bought the fabric almost two years ago (blush) at Prairie Chicks in Hague when I saw it hanging in the store.  I bought the last kit...but a bit more of some of the fabrics as I wanted to make it larger. 

I used some of my own stash and ended up with two quilt tops.  Rather than doing two quilts, I decided in my practical mind-set to do a reversible quilt. 

Our New Quilt
Our room had an old duvet that I made the year we were married (10+ years ago) and we really needed a refresh!  So thought I'd better make us something.  Didn't want to be the shoemaker without shoes, after all.

Side One


Side Two


And just a few more close-ups of side two as the pattern is more diverse in terms of fabrics.


The Pillows
Pillows finish the bed, right?  Well, I did some up to match with the left overs. 


I added a strip of the turquoise blue fabric (folded in half and inserted like a piping) between two fabrics to add a bit more interest. I am very pleased how they turned out.


The Quilting of the Quilt - Get Someone Else to do it!
I decided it would be a good idea to use my embroidery machine to 'quilt' the quilt as it took so long to finish the kids' twin-size quilts when doing free-motion quilting.  I was also proud that I was putting my embroidery machine to good use.  I found a stippling (free-motion-style) pattern online and purchased it.  Couldn't be easier...until I started to actually do it. 


It takes forever.  F-O-R-E-V-E-R to do a queen-sized quilt.  It took me three weeks to get the quilting done.  While slick to do, it still takes time to hoop the area, put it in the machine, ensure there is enough thread left to do the 5-minute design, and ensure the quilt's weight doesn't pull while embroidering.

 
I know it would have taken longer to do free-motion-quilting but I think I will be farming out the 'quilting' part to one of those fine ladies with a long-arm machine next time.  Worth the $100 or whatever.  I am always up for a new experiences, but that doesn't mean I will EVER do that again!


Tuesday, February 26, 2013

Quilt | Imogen

So how can my son have a lovely quilt and not my daughter?  So shortly after finishing Alistair's quilt, I started on Imogen's quilt.  All the fabrics were from Prairie Chicks, using the same quilt pattern design.


Finished September 2010 when Imogen was 4 years old.

 
It looks a bit longer on my daughter's bed as her bed is actually shorter than average.  It was a former hospital bed that I received from my grandmother when she passed.  It was the bed I slept in when visiting her as a child.


Here is what it looks like without all the pillows.

 
And the pillows are all leftovers, with the exception of the non-ruffled ones.  I bought a yard of fabric from a vendor at a quilt show.  Don't recall the name of the shop, but they were from Regina.


Here you can see the quilt block a bit better...and all the free-motion quilting.  Again, it took a quite a while to complete.  Now it's so soft from use and washing.


I was trying to be 'crafty' and used up the left over cuttings from the quilt top.  A bit more miss-matched than Alistair's quilt.  But I like the quirkiness of it.


Monday, February 25, 2013

Our Quilts | Alistair

This is the first installment of a three-part post on the quilts in our house.

When on maternity leave, I took a quilting class with two other new mums (with our babes in tow) at Prairie Chicks in Hague, SK.  It was great - we went out and the babies were young enough to lie on their blankets, and sleep in the strollers.  Wow that was a long time ago...in 2009 actually.

This is my son's quilt.  I really love the colours in it.  While it is definitely a boy's quilt, but it has a look for being around for years.


Like how the border frames the quilt so well.  Also you can just see the curtain that was made to match the quilt.


On the back I did a patch to show when I made (finished) the quilt.


The quilt was 'quilted' in free-motion style on my sewing machine.  Took a while but was so worth it.  Love the result.


Really enjoyed doing this block where you sew four blocks together in a square, then cut it off-centre and frame it.


Here is the back where I used just two fabrics to finish it off.  It is reversible in a sense.


Friday, February 22, 2013

Basement Closet Curtains

I hate seeing clutter and bi-fold doors pinch kids fingers...so I (finally) took the doors off the basement closet where all their toys are stored.   Now the kids can easily put their toys away (yeah right?!?).


I practiced a new technique of hidden tab top curtains (copied a RTW Pier One panel), where the loops are sewn on the wrong side.  It gives a nice 'clean' finish on the outside.


I was also glad as I got to deplete my roll, yes roll, of cream drape fabric from Designer Fabrics in Toronto.  I travelled monthly to Toronto for work from Saskatoon (ironic as we just moved back from Toronto).  I got a great idea to buy a roll of fabric and check as luggage on one of my trip. I know, what was I thinking! But it didn't cost me a dime, and it was before all the luggage restrictions.


Designer Fabrics in Toronto is great -- it's always on shows on HGTV like Sarah's house. Anytime they need fabric, they go there. Kind of like the Canadian version of Mood on Project Runway...but smaller.


Thursday, February 21, 2013

Baby Gift | Levi

Another holiday break project just wanting to be posted (better late than never).

This was made for my friend's her first grandchild.  I loved this sweet print - with cute little elephants on it. The shop only had enough for this project, so I bought it all.

The fabric is 45" wide heavy weight, good quality flannelet from Periwinkle Quilting here in Saskatoon. I prewashed it and it's lovely and soft.

 
Here is the 45" square blanket.  Too cute.
 
 
I had to include this adorable book - from Barefoot Books of course!
 
 
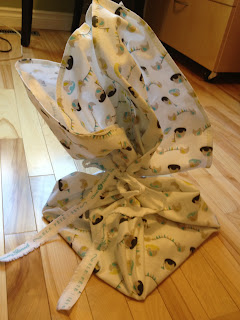
I was able to do three burp cloths.  Double layered flannelet, serged around.  I used these everyday with my babies.  They were smaller and handier than other receiving blankets.


I even rolled up the burp cloths and tied them with the cut-off selvages.
 
 
And here it is, all bundled up...for baby Levi.


Baby Gift | Calob

Okay a bit behind on posting.  These were made over the holiday break. 

I loved my large receiving blankets when the kids were babies.  My kids still use them on their beds, in the summer as a sheet, and to play with.  So when a friend had her second baby I knew what I wanted to do.

The fabric is 45" wide, heavy weight, good quality flannelet from Periwinkle Quilting here in Saskatoon.  I prewashed it and it's lovely and soft.

Loved the modern boyish print of this fabric.  Here it is 45" square blanket.
 

Finished it off by serging, folding under, and zig-zaging it.


Had to give a book too - Barefoot Books - perfect for them as big sister will be reading in the next year.


From the small amount of scrap fabric I had left, I put together double sided cloths, perfect for throwing in the diaper bag for quick clean ups / burp ups! 


Then bundled it all together to form the present.  Tied it up using the cut-off selvages.  Nothing was left to waste!


Hot Pink Pants | O+S After School

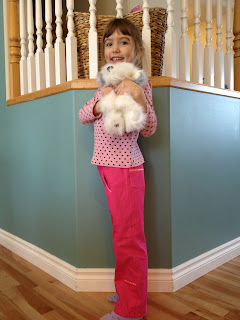
These were pants pre-cut for the Shekinah Retreat but were not completed there.  They were made over the Christmas break just in time for a Christmas present.


You will notice her showing off her new-to-her stuffed dog, a hand-me-down from a friend.  Just what a 6 year old girl needs...another stuffie!!


The fabric is a lighter weight stretch denim in shocking pink from Calgary's Out of Hand store purchased this last summer. Showing the inside as it has that stetch denim look to it. 


The trim matched perfectly and is from Periwinkle Quilting here in Saskatoon. It really finishes off the pants...and it was super affordable, unlike some trims at $4+/m, and I used under 2 m.  It's washed really well too.


I really like this pattern as it has a pieced leg, giving the opportunity to add details like the ribbon, giving it that special touch.
 

The pattern is from Oliver + S - after school top + pants.  I left off the ruffles as it would have been detail-to-death with the ribbon trim.